基本介绍
SpringBoot
SpringBoot 是全新一代的 Spring 框架
开箱即用、预定优于配置、更轻量级
常用的第三方依赖整合(通过 Maven 子父工程的方式),简化 XML 配置,全部采用注解形式,内嵌 Web 应用容器
AOP 编程的支持(AOP 面向切面编程),功能增强,注解形式
IoC(Inversion of Control)控制反转
启动顺序
调用构造函数进行数据初始化
加载配置环境及上下文环境,返回应用配置上下文
vue
MVVM 设计模式
V:视图 view
ViewModel:一个同步 View 和 Model 的对象,连接 Model 和 View
M:模型 model,在其中定义数据修改和操作的业务逻辑
双向数据绑定,通过 ViewModel 进行交互,Model 和 ViewModel 之间的交互是双向的,因此 View 数据的变化会同步到 Model 中,而 Model 数据的变化也会立即反应到 View 上
MVC、MVVM 和三层架构
MVC(设计模式)
MVVM
三层架构(体系架构设计)
高内聚,低耦合
表现层、业务逻辑层、数据访问层(SpringMVC、Spring、MyBatis)
项目介绍
Atlantis Racer JMVT 网站是由游戏爱好者组建的 Atlantis Racer JMVT 车队的网站。该网站项目采用 Vue + SpringBoot 前后端分离技术,从 0 开始开发,90% 的功能或组件自主实现,其他功能或组件采用了第三方方案,引用了 Element-UI, github-markdown-css, mavon-editor, vuex 等。由于第一次接触 Vue 和 SpringBoot 等技术,边学习、边练习、边实践,因此项目中代码有很多地方冗余、复杂或有更为简单的方案实现,还能够继续优化。网站部署地址:http://atlantisracer.tk(挂)。
开发环境:
Windows 11 + VSCode (前端、后端) + IDEA (后端) + Edge + Apifox (接口测试) + MySQL Workbench (数据库) + Git
前后端请求路径:
前端访问:localhost:8080
后端请求:
localhost:8081/api
localhost:8082/api(于 utils/baseUrl.js,controller/*/application.yml 下修改)
文件保存路径和数据库:
保存路径:
项目根目录 /Data/{photos|article_pictures}/(于 com/atlantis/common/ProjectPath.java 下修改)
测试用数据库:
TestSamples_DB.sql
实际使用数据库:
ForActualUse_DB.sql
实现的功能包括:
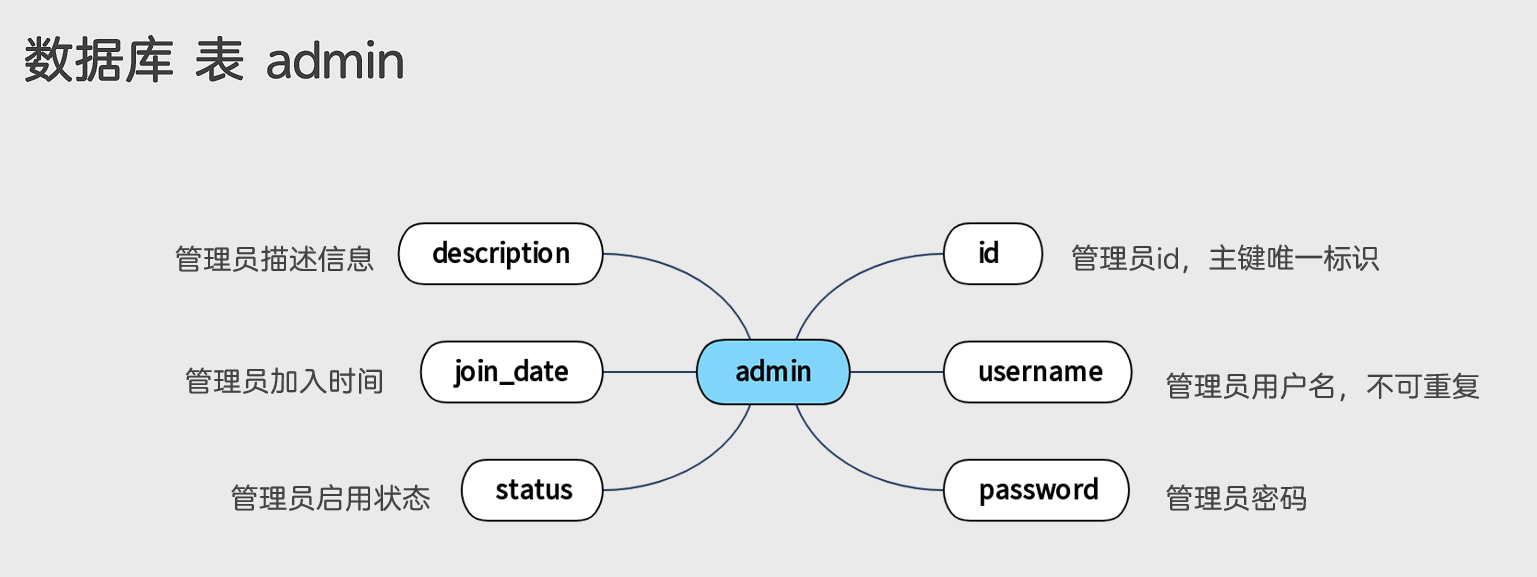
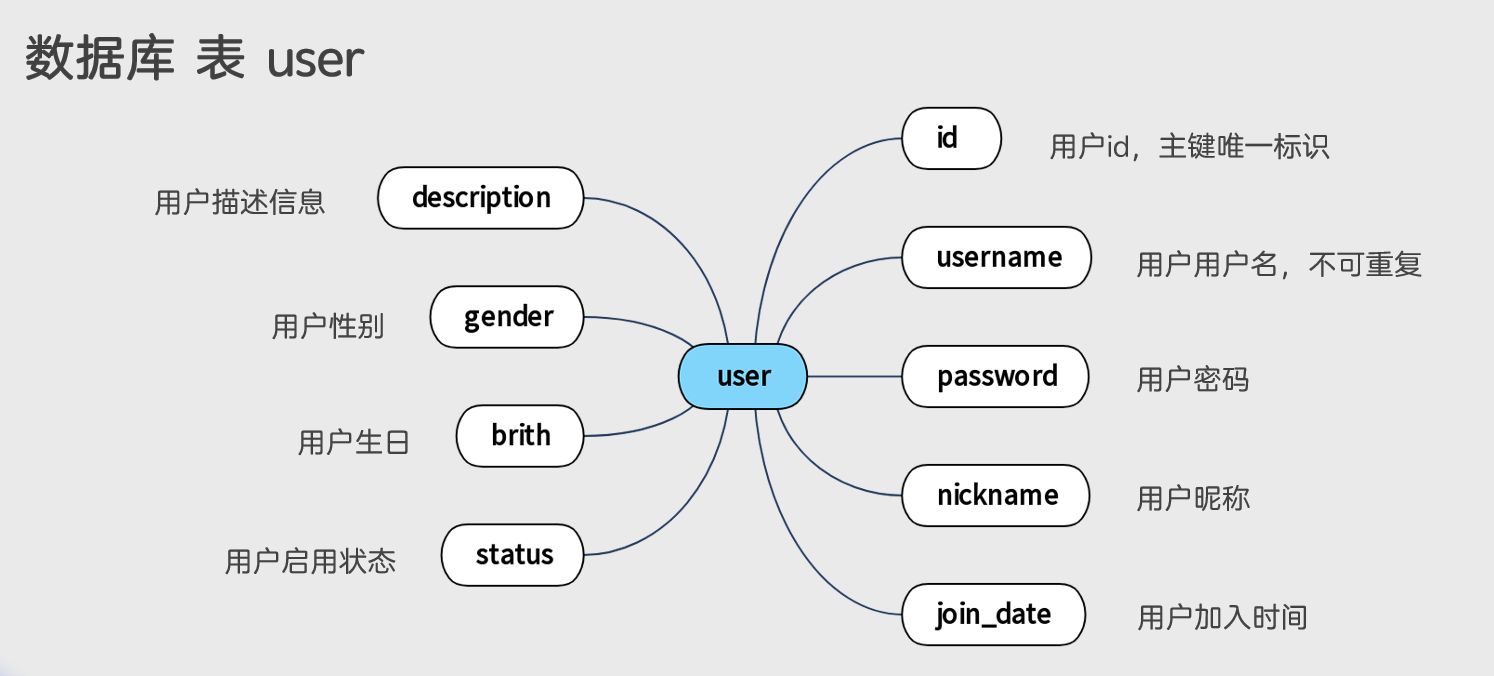
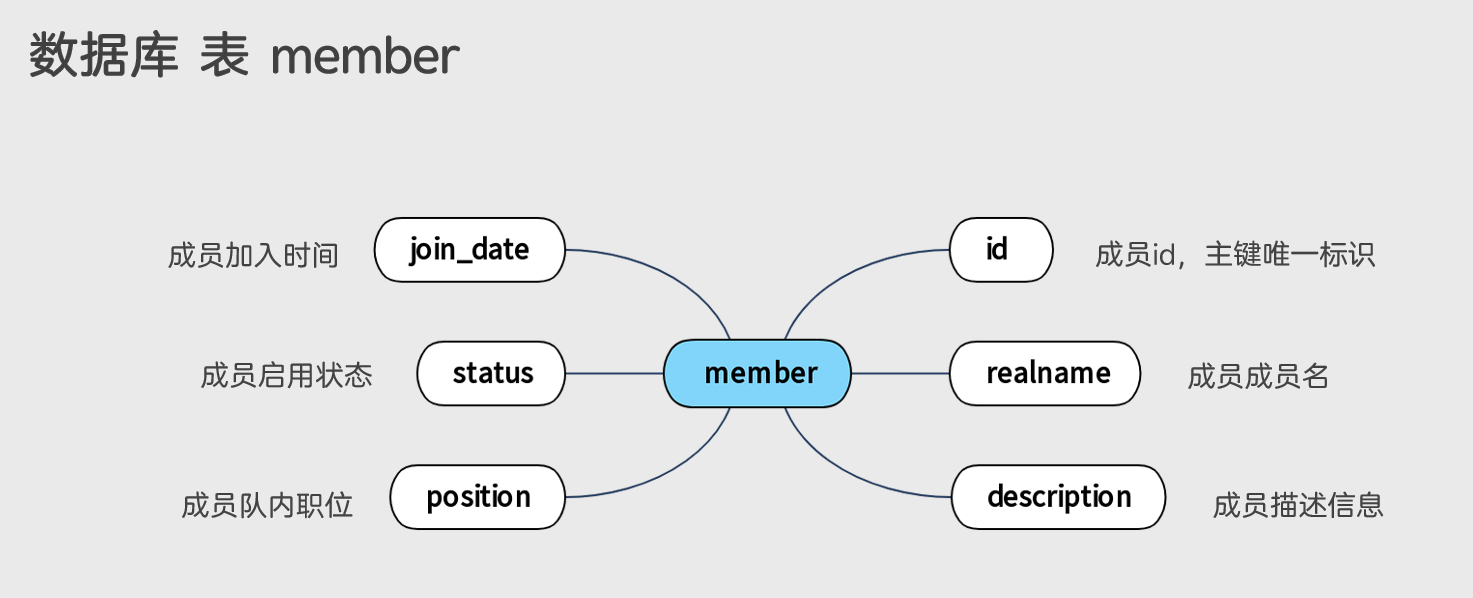
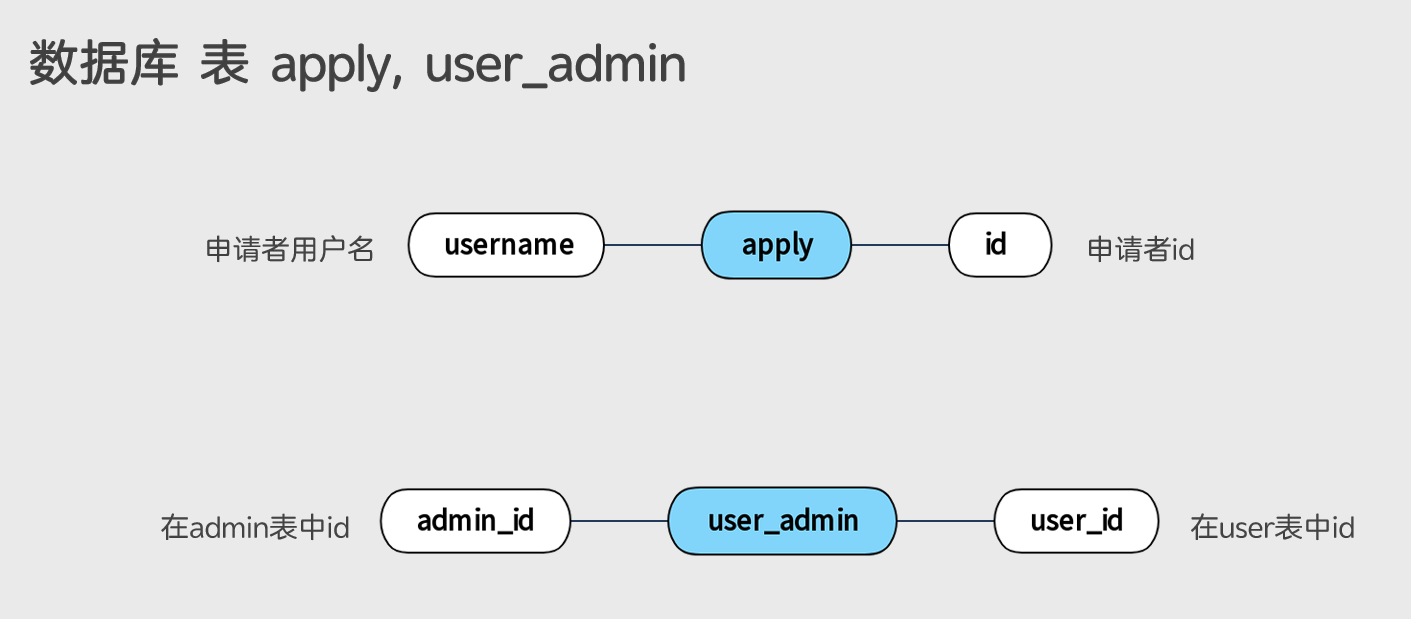
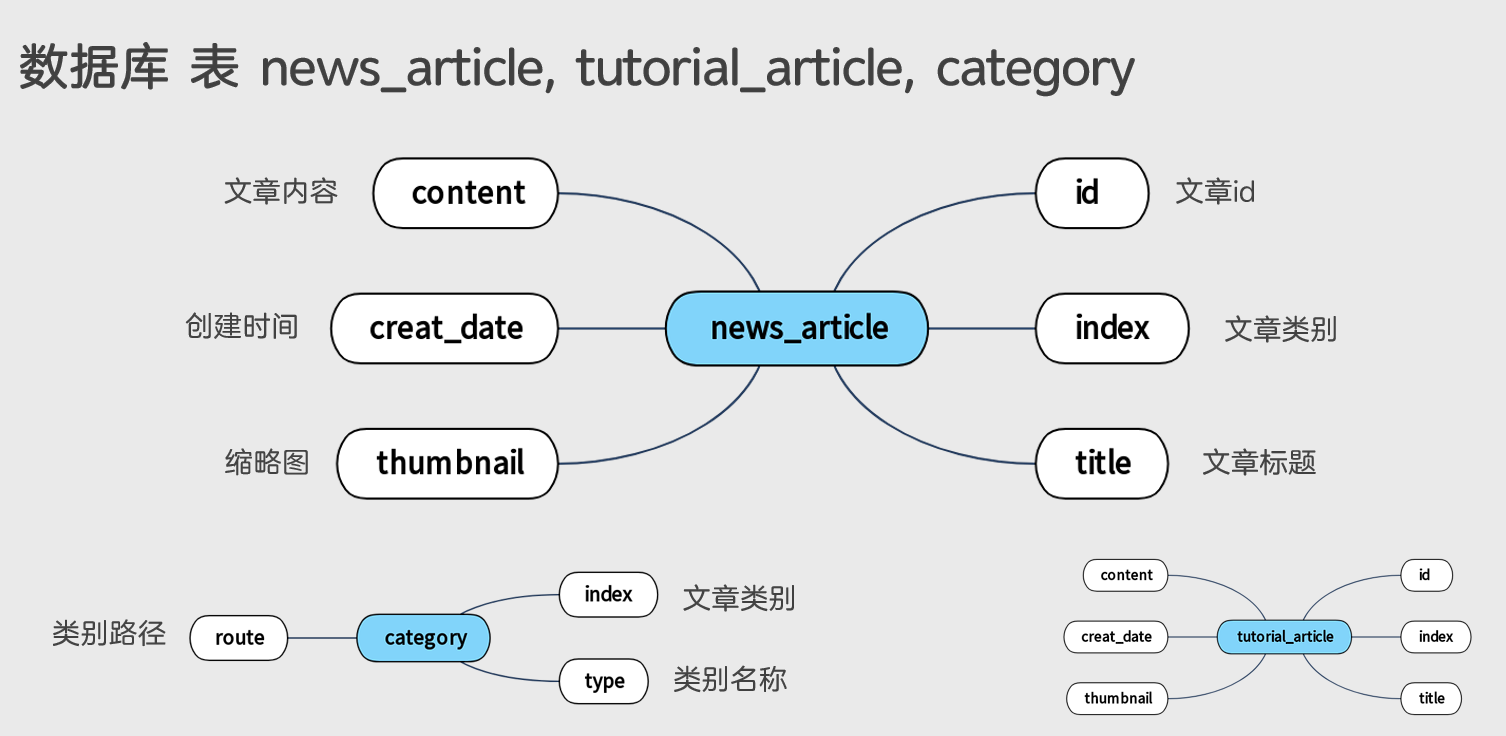
数据库表关系
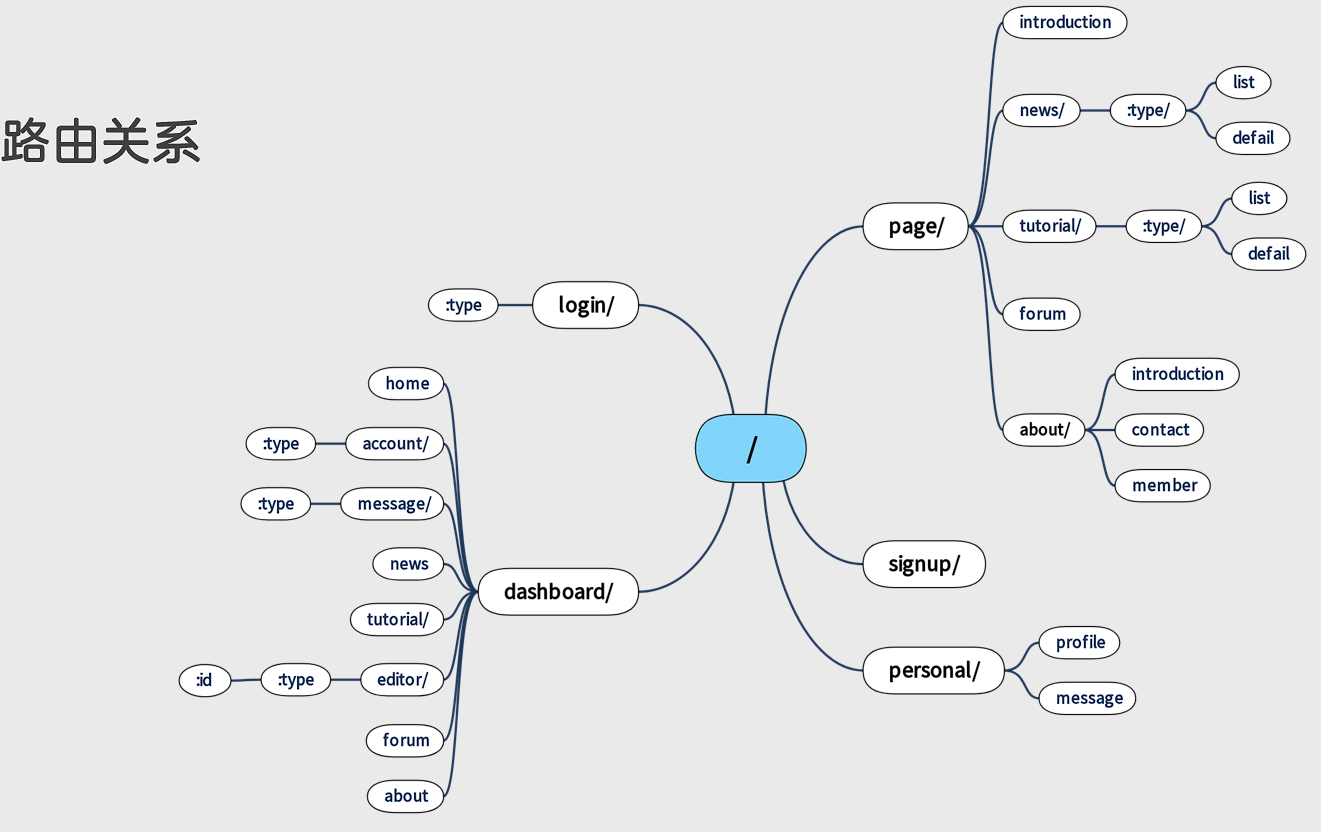
路由关系
总结
这次的项目开发,我们学习到了很多如:前端 Web 语言如 HTML、JavaScript、CSS 等;后端的语言 Java;前端的主流框架 Vue 和后端的主流框架 SpringBoot 相结合进行前后端的分离开发等。这些都是在理论课的基础上,进行知识的拓展和应用,让我们更进一步地了解企业中开发一个项目的大体流程,是宝贵的经验。
项目遇到的问题及解决方案
组件固定于浏览器某一位置:
利用 position: fixed 属性固定。
1
2
3
4
5
6
7
8
9
10
11
12
13
14
15
16
17
18
19
20
21
22
23
.top-bar { border-radius : 15px ; float : left; text-align : left; height : 150px ; width : auto; position : fixed; top : 0cm ; left : 1cm ; right : 1cm ; background-color : rgba (252 , 242 , 241 , 0.85 ); box-shadow : 5px 15px 15px 5px #888888 ; z-index : 1000 ; }
禁止页面文字被复制:
1
2
3
4
5
6
7
8
#box { -webkit-user-select: none; -moz-user-select: none; -ms-user-select: none; user-select: none; }
设置css作用范围:
1 2 <style scoped src ="@/../public/css/personalpage-style.css" > </style >
(未解决) 获取当前路由路径并映射为中文:路由跳转后,页面不刷新:
给 router-view 设置 :key 属性,路由改变,就会重新渲染。
1 2 3 4 5 6 7 8 <template > <div id ="app" > <keep-alive > <router-view v-if ="$route.meta.keepAlive" :key ="$route.fullPath" > </router-view > </keep-alive > <router-view v-if ="!$route.meta.keepAlive" > </router-view > </div > </template >
子组件(子路由)向父组件(父路由)传递参数:
通过事件进行绑定,发生某个自定义事件,绑定一个方法,参数通过方法传递。
1 2 3 4 5 6 7 8 9 <div id ="dash-content-box" > <router-view v-if ="isRouterAlive" :key ="$route.fullPath" @reload ="reload" @show-dialog ="showDialog" > </router-view > </div >
1
2
3
4
5
6
7
8
doOperation (operation, contentType, objId ) { this .$store .commit ('setOperation' , operation); this .$store .commit ('setContentType' , contentType); this .$store .commit ('setObjId' , objId); this .$emit('show-dialog' , true ) }
兄弟组件(兄弟路由)数据通信:
使用 vuex 即可。需要注意 vuex 在页面刷新后数据丢失,因此不要存储登录相关数据。
1
2
3
4
5
6
7
8
9
10
11
12
13
14
15
16
17
18
19
20
21
22
23
24
25
26
27
28
29
30
31
32
33
34
35
import Vue from 'vue' import Vuex from 'vuex' Vue .use (Vuex )const store = new Vuex .Store ({state : { operation : '' , objId : '' , contentType : '' , }, mutations : { setOperation (state, newOperation ){ state.operation = newOperation; }, setObjId (state, newId ) { state.objId = newId; }, setContentType (state, newContentType ) { state.contentType = newContentType; }, }, }) export default store
手动刷新子组件(子路由):
给子组件(子路由)设置 v-if 属性。自刷新可利用 provide, inject 注入函数依赖。刷新函数利用 this.$nextTick(function() {}) 改变绑定 v-if 的boolean变量的值。
1 2 3 4 5 6 7 <TopBar v-if ="!topBarReload" @reload ="doTopBarReload()" > </TopBar > <router-view v-if ="isRouterAlive" :key ="$route.fullPath" @reload ="reload" @show-dialog ="showDialog" > </router-view >
1
2
3
4
5
6
7
8
9
10
11
12
13
14
15
16
17
18
19
20
21
22
23
24
25
26
27
28
29
30
31
32
data ( return { isShow : false , isRouterAlive : true , topBarReload : false , } }, provide ( return { reload : this .reload , doTopBarReload : this .doTopBarReload , } }, reload ( this .isRouterAlive = false ; this .$nextTick(function ( this .isRouterAlive = true ; }) }, doTopBarReload ( this .topBarReload = true ; this .$nextTick(function ( this .topBarReload = false ; }) } inject : ['reload' ],
cors跨域:
后端设置Config类,或者设置过滤器类。
1 2 3 4 5 6 7 8 9 10 11 12 13 14 15 16 17 18 19 20 21 22 23 24 25 26 27 28 29 30 31 32 33 34 35 36 37 38 39 40 41 42 43 44 45 46 47 48 49 50 51 52 53 54 55 56 57 58 59 60 61 @Configuration public class CorsConfig { private static final long MAX_AGE = 24 * 60 * 60 ; @Bean public CorsFilter corsFilter () { UrlBasedCorsConfigurationSource source = new UrlBasedCorsConfigurationSource (); CorsConfiguration corsConfiguration = new CorsConfiguration (); corsConfiguration.addAllowedOrigin("*" ); corsConfiguration.addAllowedHeader("*" ); corsConfiguration.addAllowedMethod("*" ); corsConfiguration.setMaxAge(MAX_AGE); source.registerCorsConfiguration("/**" , corsConfiguration); System.out.println("doing CORS config..." ); return new CorsFilter (source); } } @WebFilter(filterName = "requestFilter", urlPatterns = {"/*"}) public class RequestFilter implements Filter { @Override public void init (FilterConfig filterConfig) throws ServletException { } @Override public void doFilter (ServletRequest servletRequest, ServletResponse servletResponse, FilterChain filterChain) throws IOException, ServletException { System.out.println("doing request filter..." ); HttpServletResponse response = (HttpServletResponse) servletResponse; HttpServletRequest request = (HttpServletRequest) servletRequest; response.setHeader("Access-Control-Allow-Origin" , "*" ); response.setHeader("Access-Control-Allow-Headers" , "x-requested-with,Cache-Control,Pragma,Content-Type,Token, Content-Type" ); response.setHeader("Access-Control-Allow-Methods" , "POST, GET, OPTIONS, PUT, DELETE" ); response.setHeader("Access-Control-Max-Age" , "3600" ); response.setHeader("Access-Control-Allow-Credentials" , "true" ); String method = request.getMethod(); if (method.equalsIgnoreCase("OPTIONS" )) { servletResponse.getOutputStream().write("Success" .getBytes("utf-8" )); } else { filterChain.doFilter(servletRequest, servletResponse); } } @Override public void destroy () { } }
cors跨域后session id不一致:
http://localhost:8080 或 http://172.16.12.103:8080 只能成功一个。在 application.yml 中配置 Tomcat 监听ip地址。
1
2
3
4
server: port: 8081 address: 172.16 .12 .103
1
2
3
4
5
6
7
8
9
10
11
12
13
14
15
16
17
18
19
20
21
22
23
24
25
@Configuration public class CorsConfig { private static final long MAX_AGE = 24 * 60 * 60 ; @Bean public CorsFilter corsFilter () { UrlBasedCorsConfigurationSource source = new UrlBasedCorsConfigurationSource (); CorsConfiguration corsConfiguration = new CorsConfiguration (); System.out.println("doing CORS config..." ); corsConfiguration.addAllowedOriginPattern("**" ); corsConfiguration.addAllowedHeader("*" ); corsConfiguration.addAllowedMethod("*" ); corsConfiguration.setAllowCredentials(true ); corsConfiguration.setMaxAge(MAX_AGE); source.registerCorsConfiguration("/**" , corsConfiguration); return new CorsFilter (source); } }
1
2
3
4
5
6
const request = axios.create ({ baseURL : 'http://172.16.12.103:8081' , timeout : 5000 , withCredentials : true , })
模块开发:
利用maven的继承和聚合。建立父工程,只包含 pom.xml,修改打包方式为 pom、声明子工程、统一设置依赖版本号以及子工程版本号。子工程内将 <parent> 设为父工程,<dependency> 中的依赖具有传递性。
1 2 3 4 5 6 7 8 9 10 11 12 13 14 15 16 17 18 19 20 21 22 23 24 25 26 27 28 29 30 31 32 33 34 35 36 37 38 39 40 41 42 43 44 45 <packaging > pom</packaging > <properties > <java.version > 11</java.version > <atlantis.version > 0.0.1-SNAPSHOT</atlantis.version > <mybatis.version > 2.2.2</mybatis.version > <mysql.version > 8.0.30</mysql.version > <jackson.version > 2.13.4</jackson.version > <druid.version > 1.2.13-SNSAPSHOT</druid.version > </properties > <dependency > <groupId > com.alibaba</groupId > <artifactId > druid</artifactId > <version > ${druid.version}</version > </dependency > <modules > <module > controller</module > <module > mapper</module > <module > pojo</module > <module > service</module > <module > util</module > <module > exception</module > <module > common</module > <module > config</module > <module > filter</module > </modules > <dependencyManagement > <dependencies > <dependency > <groupId > com.atlantis</groupId > <artifactId > mapper</artifactId > <version > ${atlantis.version}</version > </dependency > <dependency > <groupId > com.atlantis</groupId > <artifactId > pojo</artifactId > <version > ${atlantis.version}</version > </dependency > </dependencies > </dependencyManagement >
代码重复,进行复用:
这个项目里,Java使用继承和泛型来减少代码重复;vue内主要重复的是axios请求,采用字符串拼接减少重复。
1 2 3 4 5 6 7 8 9 10 11 12 13 14 15 16 17 18 19 20 21 22 23 24 25 26 27 28 29 30 31 32 33 34 35 36 37 38 39 40 41 42 43 44 45 46 47 48 49 50 51 52 53 54 55 56 57 58 59 60 61 62 63 64 65 66 67 68 69 70 71 72 73 74 75 76 77 78 79 80 81 82 83 84 85 86 87 88 89 90 91 92 93 94 95 96 public interface BaseService <T> { public T getById (Integer id) ; public List<T> getAll () ; public boolean insert (T obj) ; public boolean update (T obj) ; public boolean updateInfo (T obj) ; public boolean updatePwd (T obj) ; public boolean delete (Integer id) ; public T login (T login) ; } public abstract class BaseServiceImpl <T> implements BaseService <T> { @Autowired protected BaseMapper<T> baseMapper; @Override public T getById (Integer id) { return baseMapper.getById(id); } @Override public List<T> getAll () { return new ArrayList <T>(baseMapper.getAll()); } @Override public boolean insert (T obj) { return false ; } @Override public boolean update (T obj) { return (baseMapper.update(obj) == 1 ); } @Override public boolean updateInfo (T obj) { return false ; } @Override public boolean updatePwd (T obj) { return false ; } @Override public boolean delete (Integer id) { return (baseMapper.delete(id) == 1 ); } @Override public T login (T login) { return null ; } } public interface AdminService extends BaseService <Admin> {} @Service public class AdminServiceImpl extends BaseServiceImpl <Admin> implements AdminService { @Override public boolean updateInfo (Admin admin) { return (baseMapper.updateInfo(admin) == 1 ); @Override public boolean updatePwd (Admin admin) { return (baseMapper.updatePwd(admin) == 1 ); } @Override public boolean insert (Admin admin) { if (baseMapper.getByUsername(admin.getUsername()) == null ) { return (baseMapper.insert(admin) == 1 ); } else { return false ; } } @Override public Admin login (Admin login) { return (baseMapper.getByUsernameAndPassword(login.getUsername(), login.getPassword())); } }
1
2
3
4
5
6
7
8
9
10
11
12
13
14
15
16
17
18
19
20
21
22
23
24
25
26
load ({ let typeStr = '' ; if (this .type === 'admin' ) { typeStr = 'admins' ; } else if (this .type === 'user' ) { typeStr = 'users' ; } if (typeStr === '' ) { return ; } request.get ("/" + typeStr).then (res => if (res.code === code.GET_OK ) { this .items = res.data ; } }).catch (err => console .log (err) this .$notify .error ({ title : '获取失败' , }); }) },
多个页面共用一个组件:
通过路径的变化,props 进行传参。props 内的参数JavaScript内无法直接获取,可以通过 watch 监听获得。
1 2 3 4 5 6 7 8 9 10 11 12 13 14 15 16 17 18 19 20 { path : "/personal" , redirect : "/personal/profile" , component : Personal , children : [ { path : ":type" , component : PersonalContent , props : true } ] } props : ['type' ]
setTimeOut() 延迟执行:1 2 3 4 setTimeout (() => { this .reload (); }, 300 );
用户头像上传下载:
利用 ElementUI 上传控件,并修改样式。
1 2 3 4 5 6 7 8 9 10 <el-upload class = "avatar-uploader" :action = "actionUrl" :show-file-list = "false" :on-success = "handleAvatarSuccess" :before-upload = "beforeAvatarUpload" > <img v-if = "imageUrl" :src = "imageUrl" class = "avatar" > <i v-else class = "el-icon-plus avatar-uploader-icon" > </i > </el-upload >
1 2 3 4 5 6 7 8 9 10 11 12 13 14 15 16 17 18 19 20 21 22 23 24 25 26 27 28 29 handleAvatarSuccess (res, file ) { this .imageUrl = "http://localhost:8081/users/download/" + this .userId ; this .reload (); this .$notify .success ({ title : '头像更新成功' }) }, beforeAvatarUpload (file ) { if (file) { console .log ("uploading...actionUrl: " + this .actionUrl ); const postfix = file.name .split ('.' )[1 ] const isSizeOk = file.size < (2 * 1024 * 1024 ); if (['png' , 'jpeg' , 'jpg' ].indexOf (postfix) < 0 ) { this .$notify .error ({ title : '头像仅支持 .png, .jpg, .jpeg 格式' }) this .$refs .upload .clearFiles () return false } if (!isSizeOk) { this .$notify .error ({ title : '上传头像大小不能超过 2MB' }) return false } return file } }
1 2 3 4 5 6 7 8 9 10 11 12 13 14 15 16 17 18 19 20 21 22 23 24 25 26 27 28 29 30 31 32 33 34 35 36 37 38 39 40 41 42 43 44 45 46 47 48 49 50 51 52 53 54 55 56 57 58 59 60 61 62 63 64 65 66 67 68 69 @PostMapping("/upload/{id}") public Result upload (MultipartFile file, @PathVariable Integer id) { System.out.println("uploading..." ); File filePath = new File (basePath); if (!filePath.exists()) { filePath.mkdirs(); } String fileName = "userId_" + id.toString() + ".png" ; try { file.transferTo(new File (basePath + fileName)); } catch (IOException e) { throw new SystemException ("upload failed" , e, Code.SYS_ERR); } return new Result (Code.UPLOAD_OK, (String)fileName, "upload succeeded" ); } @GetMapping("/download/{id}") public Result download (HttpServletResponse response, @PathVariable Integer id) { try { FileInputStream fis = new FileInputStream (basePath + "userId_" + id.toString() + ".png" ); ServletOutputStream sos = response.getOutputStream(); response.setContentType("image/png" ); int len = 0 ; byte [] bytes = new byte [1024 ]; while ((len = fis.read(bytes)) != -1 ) { sos.write(bytes, 0 , len); sos.flush(); } fis.close(); sos.close(); } catch (Exception e) { e.printStackTrace(); return new Result (Code.DOWNLOAD_ERR, null , "no user photo" ); } return new Result (Code.DOWNLOAD_OK, basePath + "userId_" + id.toString() + ".png" , "download succeeded" ); }
分页查询:
利用 ElementUI 简化前端分页组件的开发;后端利用 page-helper 进行分页查询的业务层和控制层处理。
前端:
1 2 3 4 5 6 7 8 9 <el-pagination style ="zoom: 220%; margin-bottom: 20px" @size-change ="handleSizeChange" @current-change ="handleCurrentChange" :current-page.sync ="currentPage" :page-size ="pageSize" layout ="prev, pager, next, jumper" :total ="totalNumber" > </el-pagination >
1
2
3
4
5
6
7
8
9
10
11
12
.el-pager li { background : none !important ; } .el-pagination .btn-next , .el-pagination .btn-prev { background : none !important ; } .el-pagination button :disabled { background : none !important ; }
1
2
3
4
5
6
7
8
9
10
11
12
13
14
15
16
17
18
19
20
21
22
23
24
25
26
27
28
29
30
31
32
33
34
35
36
data ( return { currentPage : 1 , pageSize : 10 , totalNumber : 0 , } }, methods : { handleSizeChange (val ) { }, handleCurrentChange (val ) { console .log ("val: " + val); request.get ("/" + this .typeStr + "/" + this .currentPage + "/" + this .pageSize ).then (res => if (res.code === code.GET_OK ) { this .items = res.data .list ; this .totalNumber = res.data .total ; console .log ("currentpage after: " + this .currentPage ); console .log ("total number: " + this .totalNumber ); } }).catch (err => console .log (err) this .$notify .error ({ title : '获取失败' , }); }) }, }
后端:
1 2 3 4 5 6 7 8 9 10 11 12 13 14 15 16 17 18 19 20 21 22 23 24 25 26 27 28 29 30 31 public interface BaseService <T> { public PageInfo<T> getAllByPage (int pageNum, int pageSize) ; } public abstract class BaseServiceImpl <T> implements BaseService <T> { @Override public PageInfo<T> getAllByPage (int pageNum, int pageSize) { PageHelper.startPage(pageNum, pageSize); List<T> baseList = baseMapper.getAll(); return new PageInfo <T>(baseList); } } public abstract class BaseController <T> { @GetMapping("/{pageNum}/{pageSize}") public Result getAllByPage (@PathVariable Integer pageNum, @PathVariable Integer pageSize) { try { PageInfo<T> pageInfo = baseService.getAllByPage(pageNum, pageSize); Integer code = pageInfo != null ? Code.GET_OK : Code.GET_ERR; String msg = pageInfo != null ? "get succeeded" : "get failed" ; return new Result (code, pageInfo, msg); } catch (SystemException e) { throw new SystemException ("unknown error occurred" , Code.SYS_ERR); } } }
搜索结果实时显示:
使用 watch: 对 <input> 输入值进行监听。
1 2 3 4 5 6 7 8 9 10 11 12 13 14 15 16 17 18 19 20 21 22 23 24 25 26 27 28 29 30 31 32 33 34 watch : { searchInput (val ) { if (val.trim () === '' ) { this .load (); return ; } setTimeout (() => { request.get ("/" + this .typeStr + "/" + val.trim () + "/" + this .currentPage + "/" + this .pageSize ).then (res => if (res.code === code.GET_OK && res.data .total ) { this .items = res.data .list ; this .totalNumber = res.data .total ; } else { this .items = []; this .totalNumber = 0 ; this .$notify .error ({ title : message.FIND_ERR , }) } }).catch (err => this .$notify .error ({ title : message.REQUEST_ERR , }) }) }, 200 ); } },
浮动元素导致父元素高度塌陷:
添加以下css:
1
2
3
4
5
6
7
8
9
10
11
12
13
14
.father { } .son { float : left; } .father ::after {content :"" ;clear : both;display : block;}
localStorage过期时间:
封装了localStorage,在存储的同时将时间存进去。
1 2 3 4 5 6 7 8 9 10 11 12 13 14 15 16 17 18 19 20 21 22 23 24 25 26 27 28 29 30 31 32 33 34 35 36 37 38 39 40 41 42 43 44 45 46 let storage = { set (key, val, expired ) { let obj = { data : val, time : Date .now (), expired } localStorage .setItem (key, JSON .stringify (obj)); }, get (key ) { let val = localStorage .getItem (key); if (!val) { return val; } val = JSON .parse (val); if (Date .now () - val.time > val.expired ) { localStorage .removeItem (key); return null } return val.data ; }, remove (key ) { localStorage .removeItem (key); }, } export default storage;import storage from './utils/storage.js' Vue .prototype $storage =storage;this .$storage .set ('item' , item, 24 * 60 * 60 );
解析 Markdown 字符串:
使用 vue-markdown 插件,并引入 github-markdown-css 文件。
1
2
3
npm install vue-loader vue-template-compiler -D npm install --save vue-markdown npm install github-markdown-css
1 2 import 'github-markdown-css/github-markdown.css'
1 2 3 4 5 6 7 8 9 10 11 12 13 import VueMarkdown from 'vue-markdown' export default { components : { VueMarkdown }, data () { return { value : MarkdownData } } }
1 2 3 4 <div class ="markdown-body" > <VueMarkdown :source ="value" > </VueMarkdown > </div >
1 2 3 4 5 6 7 .markdown-body { color : #2c3e50 ; font-size : 30px ; background-color : rgba (252 , 242 , 241 , 0 ); }
mavon-editor 图片上传、回显:mavon-editor 使用方法:mavon-editor
mavon-editor 图片上传:pictures-upload
自定义 imgAdd 事件,后端设置上传接口;回显时设置 URL 磁盘映射,直接通过 URL 访问磁盘文件。
1 2 3 4 5 6 7 8 9 10 11 12 13 14 15 16 17 18 19 20 21 22 23 24 25 26 $imgAdd(pos, $file){ var formdata = new FormData (); formdata.append ('file' , $file); this .$axios({ url : this .$store .state .newsArticleImgBaseUrl + "upload" , method : 'post' , data : formdata, headers : { 'Content-Type' : 'multipart/form-data' }, timeout : 5000 , withCredentials : true , }).then ((res ) => { let result = JSON .parse (JSON .stringify (res)); if (result.data .code === code.UPLOAD_OK ) { this .$refs .md .$img2Url(pos, this .$store .state .newsArticleImgBaseUrl +"download/" + result.data .data ); } }) }
1 2 3 4 5 6 7 8 9 10 11 12 13 14 15 16 17 18 19 20 21 22 23 24 25 26 27 28 29 30 31 32 33 34 35 36 37 38 39 40 41 42 43 44 45 46 47 48 @PostMapping("/upload") public Result upload (MultipartFile file) { System.out.println("uploading..." ); File filePath = new File (basePath); if (!filePath.exists()) { filePath.mkdirs(); } String postfix = Objects.requireNonNull( file.getOriginalFilename()).substring( (file.getOriginalFilename().lastIndexOf("." ))); String fileName = GenerateMD5.encrypt(file.getOriginalFilename()) + postfix; try { file.transferTo(new File (basePath + fileName)); } catch (IOException e) { throw new SystemException ("upload failed" , e, Code.SYS_ERR); } return new Result (Code.UPLOAD_OK, fileName, "upload succeeded" ); } @Configuration public class WebMvcConfig extends WebMvcConfigurerAdapter { @Value("${atlantis.articlePicturesBasePath}") private String basePath; @Override public void addResourceHandlers (ResourceHandlerRegistry registry) { registry.addResourceHandler("/newsArticles/download/**" ) .addResourceLocations("file:" + basePath); } }
<div> 元素内超过范围文字显示省略号:1 2 3 4 5 6 7 8 .div { width : 60% ; text-align : left; overflow : hidden; text-overflow : ellipsis; white-space : nowrap; }